https://www.roomdisplaycenter.com/user
https://shopifylyn.myshopify.com/admin


 5 Crédits Restants Continuer les achats
 Mettre à jour vos préférences
Prénom
Nom
Write this code down :
HLGC-WMSZ
Get the SDK

x
T-shirt model
Quantity
%
%
Remise sur le Total:
%
représentant
Taxe sur le Total:
%
représentant
OUI

1.0.18 of the SDK by adding the following lines to your build.gradle:// Pushy SDK
compile 'me.pushy:sdk:1.0.18'
// Pushy SDK Dependency - Jackson
compile (
[group: 'com.fasterxml.jackson.core', name: 'jackson-core', version: '2.2.3'],
[group: 'com.fasterxml.jackson.core', name: 'jackson-annotations', version: '2.2.3'],
[group: 'com.fasterxml.jackson.core', name: 'jackson-databind', version: '2.2.3']
)Alternatively, download sdk-1.0.18.jar and pushy-jackson.jar and include them manually. If you’re interested, check out the full changelog to see what’s new in the latest version of the Pushy SDK.
If your IDE can’t find the package, make sure you have jcenter() set up as the artifact repository in your project-wide build.gradle. If your app already imports the com.fasterxml.jackson library, you can safely omit the com.fasterxml.jackson.core compile declaration altogether.
ProGuard Compatibility
If you use ProGuard, make sure the following lines are present in your proguard-rules.pro file:
-dontwarn com.fasterxml.**
-dontwarn org.eclipse.paho.client.mqttv3.**

-keep class me.pushy.** { *; }
-keep class com.fasterxml.** { *; }
-keep class org.eclipse.paho.client.mqttv3.** { *; }
Register Devices
Register Devices
Devices need to be uniquely identified to receive push notifications.
Every device is assigned a unique registration ID that you can use to push it at any given time. Once the device has been assigned a registration ID, it should be stored in your application’s backend database. When you’re ready to push the device, your backend server will send its registration ID to our REST API, and we’ll deliver the push notification to the corresponding device.
Device Registration
Simply add the following blocking code to your application when you’re ready to register the device:
String registrationID = Pushy.register(getApplicationContext());Note: Pushy.register(Context) is a synchronous, blocking call, so make sure to execute it in only within a background thread.
Asynchronous Example
Add the following code to your application when you’re ready to register the device:
new RegisterForPushNotificationsAsync().execute();Copy the following RegisterForPushNotificationsAsync() class implementation and modify it accordingly to send devices’ registration IDs to your backend server. You can skip the backend implementation for now, we’ll get to that later.
private class RegisterForPushNotificationsAsync extends AsyncTask<Void, Void, Exception> {
    protected Exception doInBackground(Void... params) {
        try {
            // Assign a unique registration ID to this device
            String registrationID = Pushy.register(getApplicationContext());

            // Send the registration ID to your backend server via an HTTP GET request
            new URL("https://{YOUR_API_HOSTNAME}/register/device?registration_id=" + registrationID).openConnection();
        }
        catch (Exception exc) {
            // Return exc to onPostExecute
            return exc;
        }

        // Success
        return null;
    }

    @Override
    protected void onPostExecute(Exception exc) {
        // Failed?
        if (exc != null) {
            // Show error as toast message
            Toast.makeText(getApplicationContext(), exc.toString(), Toast.LENGTH_LONG).show();
            return;
        }

        // Succeeded, do something to alert the user
    }
}
Modify Launcher Activity
Modify Launcher Activity
Invoke Pushy.listen(this) in your launcher activity’s onCreate() method so that Pushy’s internal notification listening service will restart itself, if necessary.
Find:
super.onCreate(savedInstanceState);Add Below:
Pushy.listen(this);Android 6.0 Compatibility
Skip this if your targetSdkLevel is less than 23.
Android 6.0 and newer versions require apps with a targetSdkLevel >= 23 to explicitly request permissions from users via permission dialogs. Since Pushy persists devices’ registration IDs in the external storage (to survive app reinstallation), you must add the following code to your app’s launcher activity.
Find:
Pushy.listen(this);Add Below:
// Check whether the user has granted us the READ/WRITE_EXTERNAL_STORAGE permissions
if (ContextCompat.checkSelfPermission(getApplicationContext(), Manifest.permission.WRITE_EXTERNAL_STORAGE) != PackageManager.PERMISSION_GRANTED) {
    // Request both READ_EXTERNAL_STORAGE and WRITE_EXTERNAL_STORAGE so that the
    // Pushy SDK will be able to persist the device's registration ID in the external storage
    ActivityCompat.requestPermissions(this, new String[]{Manifest.permission.READ_EXTERNAL_STORAGE, Manifest.permission.WRITE_EXTERNAL_STORAGE}, 0);
}
Modify AndroidManifest
Modify AndroidManifest
Declare permissions, services, and receivers in your app’s AndroidManifest.xml file.
Declare Permissions
Pushy requires that you declare the following permissions:
android.permission.INTERNET– so that devices will be able to connect to our serviceandroid.permission.WAKE_LOCK– so that devices won’t disconnect their Wi-Fi connection during sleepandroid.permission.ACCESS_NETWORK_STATE– so that the SDK will be able to check for an active Internet connectionandroid.permission.RECEIVE_BOOT_COMPLETED– so that devices will reconnect to our network after they finish booting upandroid.permission.WRITE_EXTERNAL_STORAGE– so that the SDK will be able to persist devices’ registration IDs in the external storage
Add the following lines to your AndroidManifest.xml, inside the <manifest> tag:
<!-- Pushy Permissions -->

<uses-permission android:name="android.permission.INTERNET" />
<uses-permission android:name="android.permission.WAKE_LOCK" />
<uses-permission android:name="android.permission.ACCESS_NETWORK_STATE" />
<uses-permission android:name="android.permission.RECEIVE_BOOT_COMPLETED" />
<uses-permission android:name="android.permission.WRITE_EXTERNAL_STORAGE"/>

<!-- End Pushy Permissions -->
You should manually omit any permission declarations that your app already asks for.
Note: android.permission.WRITE_EXTERNAL_STORAGE is optional – it is necessary only for persisting devices’ registration IDs in the external storage for when your app is reinstalled, so we don’t charge you twice for the same device. If this permission is not declared, the SDK will persist devices’ registration IDs only within your app’s SharedPreferences, which are cleared when your app is uninstalled.
Add Services & Receivers
Pushy requires that you add the following internal services and receivers to your AndroidManifest.xml:
me.pushy.sdk.receivers.PushyBootReceiver– so that devices will reconnect to our network when they boot upme.pushy.sdk.receivers.PushyUpdateReceiver– so that devices will reconnect to our network when your app gets updatedme.pushy.sdk.services.PushySocketService– so that devices will be able to establish an idle socket connection to our service
Add the following lines to your AndroidManifest.xml, inside the <application> tag:
<!-- Pushy Declarations -->

<!-- Pushy Notification Receiver -->
<!-- Incoming push notifications will invoke the following BroadcastReceiver -->
<receiver android:name=".PushReceiver" android:exported="false">
    <intent-filter>
        <!-- Do not modify this -->
        <action android:name="pushy.me" />
    </intent-filter>
</receiver>

<!-- Pushy Update Receiver -->
<!-- Do not modify - internal BroadcastReceiver that restarts the listener service -->
<receiver android:name="me.pushy.sdk.receivers.PushyUpdateReceiver" android:exported="false">
    <intent-filter>
        <action android:name="android.intent.action.PACKAGE_REPLACED" />
        <data android:scheme="package" />
    </intent-filter>
</receiver>

<!-- Pushy Boot Receiver -->
<!-- Do not modify - internal BroadcastReceiver that restarts the listener service -->
<receiver android:name="me.pushy.sdk.receivers.PushyBootReceiver" android:exported="false">
    <intent-filter>
        <action android:name="android.intent.action.BOOT_COMPLETED"/>
    </intent-filter>
</receiver>

<!-- Pushy Socket Service -->
<!-- Do not modify - internal socket service -->
<service android:name="me.pushy.sdk.services.PushySocketService"/>

<!-- End Pushy Declarations -->
Note: Ignore the .PushReceiver reference error. We’ll take care of that in the next step.
Setup BroadcastReceiver
Setup BroadcastReceiver
Declare a BroadcastReceiver that will receive your push notifications when they arrive. Your app can then execute any relevant action in response, such as displaying a notification, playing a sound, making a request, etc.
Implementation Example
Create a PushReceiver.java file within your app with the following sample code that displays a notification when a push is received:
package {YOUR_PACKAGE_NAME};

import android.content.Intent;
import android.graphics.Color;
import android.content.Context;
import android.media.RingtoneManager;
import android.app.NotificationManager;
import android.content.BroadcastReceiver;
import android.support.v4.app.NotificationCompat;

public class PushReceiver extends BroadcastReceiver {
    @Override
    public void onReceive(Context context, Intent intent) {
        String notificationTitle = "Pushy";
        String notificationText = "Test notification";

        // Attempt to extract the "message" property from the payload: {"message":"Hello World!"}
        if (intent.getStringExtra("message") != null) {
            notificationText = intent.getStringExtra("message");
        }

        // Prepare a notification with vibration, sound and lights
        NotificationCompat.Builder mBuilder = new NotificationCompat.Builder(context)
                .setSmallIcon(android.R.drawable.ic_dialog_info)
                .setContentTitle(notificationTitle)
                .setContentText(notificationText)
                .setLights(Color.RED, 1000, 1000)
                .setVibrate(new long[]{0, 400, 250, 400})
                .setSound(RingtoneManager.getDefaultUri(RingtoneManager.TYPE_NOTIFICATION));

        // Get an instance of the NotificationManager service
        NotificationManager mNotifyMgr = (NotificationManager) context.getSystemService(context.NOTIFICATION_SERVICE);

        // Build the notification and display it
        mNotifyMgr.notify(1, mBuilder.build());
    }
}
Make sure to replace {YOUR_PACKAGE_NAME} with your package name, such as com.my.app.
Feel free to modify this sample code to suit your own needs. In the next step, we’ll take a look at how to parse the incoming payload data sent by your backend server.
Parse Notification Data
Parse Notification Data
Any payload data that you send with your push notifications is made available to your app via the Intent extras of your PushReceiver class.
If you were to send a push notification with the following data:
{"id": 1, "success": true, "message": "Hello World"}Then you’d be able to retrieve each value from within your PushReceiver.java file like so:
int id = intent.getIntExtra("id");
String message = intent.getStringExtra("message");
boolean success = intent.getBooleanExtra("success");
Note: Unlike Google Cloud Messaging, we do not stringify your JSON values, except if you supply nested JSON objects. This means that if you send {"id": 3}, you’d retrieve that value in the receiver using intent.getIntExtra("id");
Send Test Notification
Send Test Notification
Input your device registration ID and select your app to send a test push notification:
Note: If your app is not automatically detected, please manually copy the Secret API Key from the Developer Dashboard and paste it into the form.
Check if your device received the notification. Did it work? If not, contact us, we’ll help you out.
Android Setup Complete
Congratulations on implementing Pushy in your app!
Now, all that’s left is to setup your backend. Head on over to the Backend Setup guide to begin persisting registration IDs as well as implementing the logic for sending push notifications to your app.
Backend Setup
iOS Setup
To start sending push notifications to iOS devices with Pushy, you’ll need to make a few changes to your application.
Introduction
Get the SDK
Get the SDK
Skip to the next section if you have already installed CocoaPods before.
Run the following commands in the same directory as your .xcodeproj file to install CocoaPods, the popular Cocoa dependency manager, and to initialize a Podfile within your project directory:
$ sudo gem install cocoapods --pre
$ pod init
Install the SDK
Import version 1.0.1 of the SDK by adding the following statement to your project’s Podfile within the target declaration:
pod 'Pushy', '1.0.1'Note: Verify that your Podfile contains the use_frameworks! declaration.
Save the file and run the following command to install the SDK:
$ pod installClose all open Xcode windows. From now on, open your project using the .xcworkspace file instead of the .xcodeproj for CocoaPods integration to work.
If you’re interested, check out the full changelog to see what’s new in the latest version of the SDK.
Enable Capability
Enable Capability
You must enable the Push Notifications capability for your app to register for and receive push notifications.
Before proceeding with this step, make sure you have configured a Bundle ID for your app target in the project editor, and have configured Xcode to use an iCloud account with an active Apple Developer Program Membership.
Simply go to the project editor for your target, select the Capabilities tab, and turn on the Push Notifications capability.
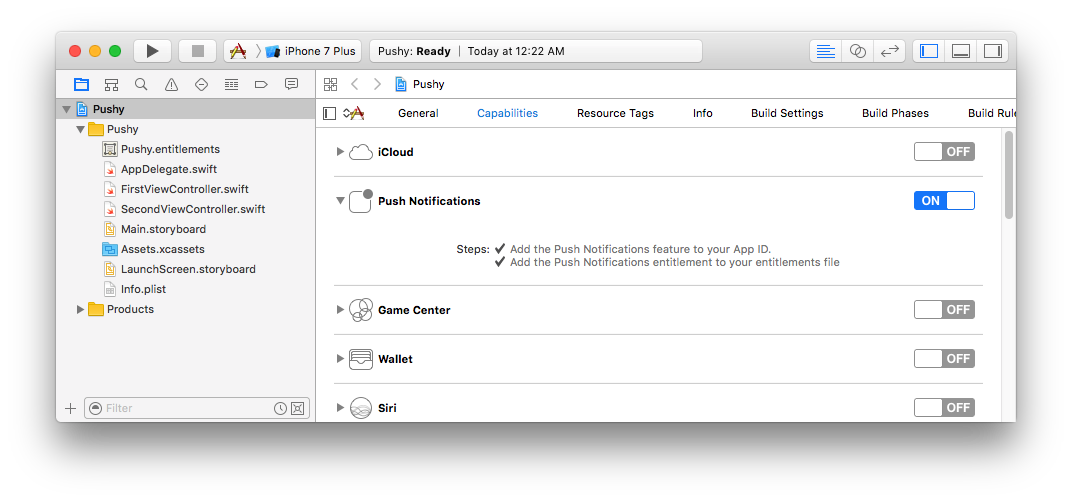 Note: Xcode should display two checkmarks indicating that the capability was successfully enabled.
Register Devices
Register Devices
Devices need to be uniquely identified to receive push notifications.
We assign every device a unique registration ID that you can use to push it at any given time. Once the device has been assigned a registration ID, it should be stored locally and persisted in your backend server when you have more information about the user. When you’re ready to push the device, your backend server will send its registration ID to our REST API, and we’ll deliver the push notification to the corresponding device.
First, import the SDK by adding the following to the top of your AppDelegate class:
import PushySDKRegister devices by initializing the SDK in the didFinishLaunchingWithOptions method of the AppDelegate class and calling pushy.register():
// Initialize Pushy SDK
let pushy = Pushy(self, application: application)

// Register the device for push notifications
pushy.register({ (error, registrationId) in
    // Handle registration errors
    if error != nil {
        return print ("Registration failed: \(error!)")
    }

    // Print registration ID to console
    print("Pushy registration ID: \(registrationId)")

    // Persist the registration ID locally
    // and send it to your backend later
    UserDefaults.standard.set(registrationId, forKey: "pushyToken")
})
Note: You must always call pushy.register() in your didFinishLaunchingWithOptions method to detect updates to the internal APNs device token, even if the device has already been registered in the past.
Additional Note: The iOS simulator cannot register for, nor receive push notifications.
Listen for Notifications
Listen for Notifications
Declare a callback within your AppDelegate class to listen for incoming notifications.
As soon as the user interacts with your notification by either swiping or clicking on it, or in case your app is in the foreground, your listener will be invoked and your app can then execute any relevant action in response, such as playing a sound, displaying the relevant storyboard, making a request, etc.
Add the following within the AppDelegate class, after pushy.register():
// Listen for push notifications
pushy.setNotificationHandler({ (data, completionHandler) in
    // Print notification payload data
    print("Received notification: \(data)")

    // You must call this completion handler when you finish processing
    // the notification (after fetching background data, if applicable)
    completionHandler(UIBackgroundFetchResult.newData)
})
Make sure to invoke the completionHandler with an appropriate UIBackgroundFetchResult when you’re done processing the notification.
Note: This callback will be invoked in the background, without requiring user interaction, if you send the content_available flag with your push notifications, as documented in the Send Notifications API.
Parse Notification Data
Any payload data that you send with your push notifications is made available to your app via the data parameter of the setNotificationHandler callback.
If you were to send a push notification with the following data payload:
{"id": 1, "secret": "payload"}Then you’d be able to retrieve these values in your setNotificationHandler callback like so:
// Safely unwrap "id" parameter (Int)
if let id = data["id"] as? Int {
    print("id: \(id)")
}

// Safely unwrap "secret" parameter (String)
if let secret = data["secret"] as? String {
    print("secret: \(secret)")
}
Setup APNs Authentication
Setup APNs Authentication
Configure the dashboard with an APNs Auth Key in order to send notifications.
Pushy routes your iOS push notifications through APNs, the Apple Push Notification Service. To send push notifications with APNs, we need to be able to authenticate on behalf of your app. This is achieved by generating an APNs Auth Key and uploading it to the Developer Dashboard.
Generate Key
In the Apple Developer Center, visit the APNs Auth Key creation page and choose Apple Push Notification Authentication Key (Sandbox & Production).
Click Continue and download the .p8 key file:
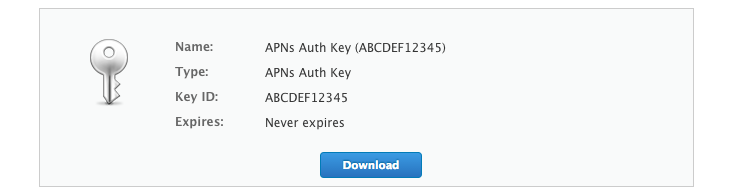
Note: Keep track of the assigned Key ID for the next step.
Upload Key
Visit the Developer Dashboard, scroll down to your iOS application, and click Configure APNs Auth.
Enter the following fields:
- APNs Auth Key – the auth key
.p8file you downloaded in the previous step - Key ID – the Key ID assigned to the key you downloaded in the previous step
- Team ID – the Team ID of your Apple Developer Account, available in Membership Details
Click Submit to finish setting up APNs authentication for your app.
Note: Avoid revoking your APNs Auth Key in the Apple Developer Center. Otherwise, you will not be able to send notifications with Pushy. If you think your key was compromised, generate a new one in the Apple Developer Center. Then, upload it to the Developer Dashboard. Finally, revoke your old key in the Apple Developer Center.
Send Test Notification
Send Test Notification
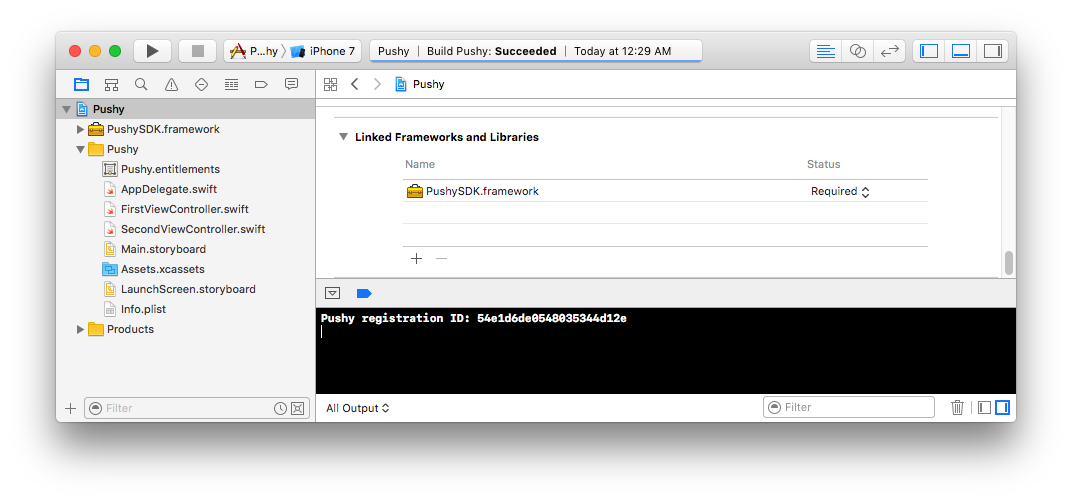
Run your app on a physical device, allow your app to receive push notifications, and observe the Xcode console for your device registration ID:
Lock your iOS device, input your device registration ID and select your app to send a test push notification:
Note: If your app is not automatically detected, please manually copy the Secret API Key from the Developer Dashboard and paste it into the form.
Check if your device received the notification. Did it work? If not, contact us, we’ll help you out.
iOS Setup Complete
Congratulations on implementing Pushy in your app!
Now, all that’s left is to setup your backend. Head on over to the Backend Setup guide to begin persisting registration IDs as well as implementing the logic for sending push notifications to your app.
Backend Setup
Backend Setup
To actually send push notifications with Pushy, you’ll need to make a few modifications to your backend server.

Trop, beaucoup trop long à charger…
Je ne comprends pas de telles dérives !>/i>
J’aimeJ’aime
Vous voulez parler de quoi ? Vous voulez copier mon formulaire de contact, pas de problème faites le si vous voulez bien?
J’aimeJ’aime